Introduction
This document provides a quick guide on how to take a Shipment through its lifecycle in the One Network System.
The lifecycle or states of a Shipment are primarily as follows:
- Awaiting -> Tendered -> Confirmed -> In-transit – Delivered
The following describes this lifecycle and states in more detail:
- Shipments will begin in the Awaiting state.
A Shipment in the Awaiting state is one that has just been created and is waiting to be tendered to a Carrier. Hub/Shippers may bypass the tendering process and just save the Shipment directly to a Carrier which would move it to the Confirmed state. - Tendered – Shipments will be in this state when a Shipment is tendered to the Carrier. The Tendered state is a solicitation by the Hub/Shipper to the Carrier offering them the chance to haul their Shipment. Carriers will have the ability to either Accept or Reject this tender.
- Confirmed – If a Tender is accepted by the Carrier, the Shipment will then move to a Confirmed state. Confirmed means that the Carrier has agreed to haul the Shipment for the Hub/Shipper and therefore is the confirmed Carrier on the Shipment. Additionally, a Hub/Shipper may bypass the tendering process and save a Shipment directly to a Carrier to the Confirmed state.
- In Transit – When a Shipment has been picked up from the Hub/Shipper by the Carrier and a "Picked Up" action has been added to the Shipment, the Shipment will move to an Intransit state. During this state, it is assumed that the freight is in the Carrier's possession. A Carrier may enter status updates by adding tracking events while en route such as Delayed, Update Current Position, etc.
- Delivered – This is the end of the Shipment life cycle. When a Shipment has been delivered at the Consignee, a "Delivered" action can be added to the Shipment. The Delivered action means that the Carrier has fulfilled their obligation to haul the Shipment from the Hub/Shipper to the Consignee and that possession of the goods has been given to the Consignee.
Taking a Shipment through its Lifecycle
The following steps describes on how to add a Pickup action to a Movement/Shipment in the Confirmed state – this will move the Movement/Shipment to the In-transit state (Note – this action is typically performed by the Carrier).
- Log in to the One Network System.
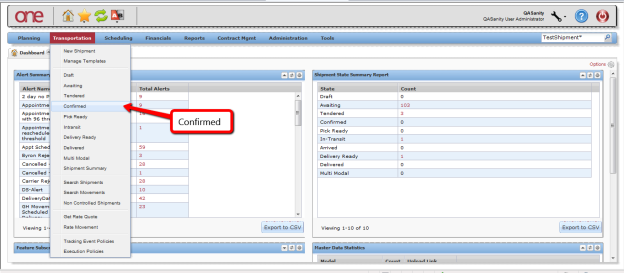
- Select Transportation -> Confirmed to see Shipments that have been accepted or have been confirmed to the Carrier.
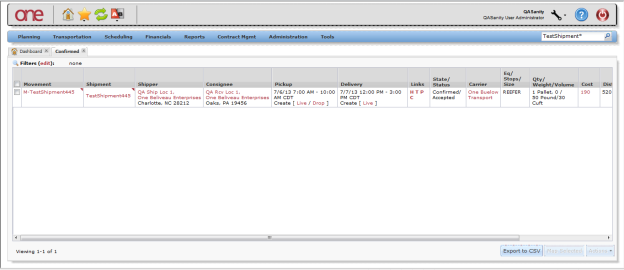
- The Confirmed page is displayed with a summary list of the Shipments.
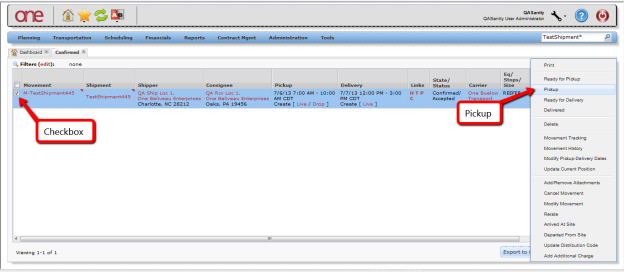
- To signify that the Carrier has picked up a Movement/Shipment, use one of the following two methods:
Method 1:- Select the check box next to the Movement Number.
- Select the Actions button at the bottom of the screen.
- Select Pickup.
Note: If there are multiple Shipments under the Movement, the Pickup action is applied to all the Shipments.
Method 2:- Select the triangle symbol next to the Movement Number.
- Select Pickup action from the Movement list.
Note: If there are multiple Shipments under the Movement, the Pickup action is applied to all the Shipments. If you want to signify a Pickup action just for a single Shipment, select the triangle next to the Shipment Number and select the Pickup action from the Shipment list.
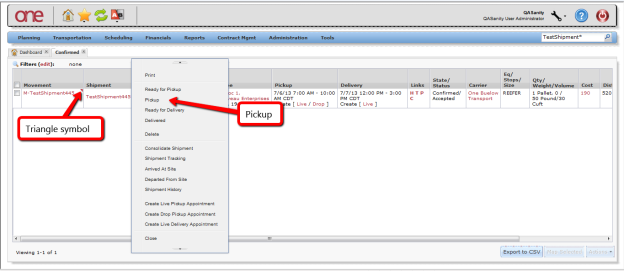
- Once the Movement (and all the Shipments under it) has been physically picked up and the Pickup action applied, the Movement is moved into the In-transit state.
- To view the Movements, Select Transportation -> In-transit.
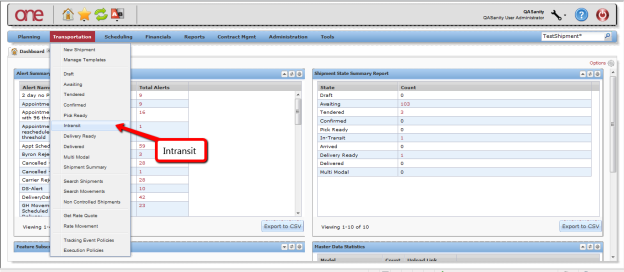
- The In-transit screen will be displayed:
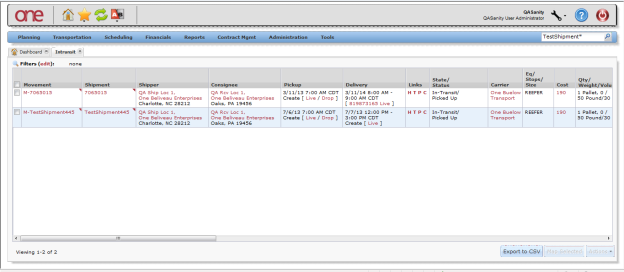
The following steps describes on how to add a Delivered action to a Movement/Shipment in the Intransit state – this will move the Movement/Shipment to the Delivered state (Note – this action is typically performed by the Carrier).
- Log in to the One Network System.
- Select Transportation -> Intransit to see Movements/Shipments that have been picked up by the Carrier.

- The Intransit screen is displayed with a list of the Movements/Shipments that have been picked up.

- To signify that the Carrier has delivered the Movement/Shipment, use one of the following two methods:
Method 1 - Select the check box next to the Movement Number.
- Select the Actions button at the bottom of the screen.
- Select Delivered.
Note: If there are multiple Shipments under the Movement, the Delivered action will be applied to all the Shipments.
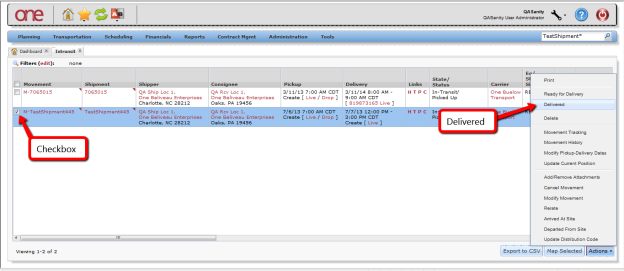
Method 2:- Select the triangle symbol next to the Movement Number.
- Select the Delivered action from the Movement list.
Note: If there are multiple Shipments under the Movement, the Delivered action will be applied to all the Shipments. If you want to signify a Delivered action just for a single Shipment, select the triangle next to the Shipment Number and select the Delivered action from the Shipment list.
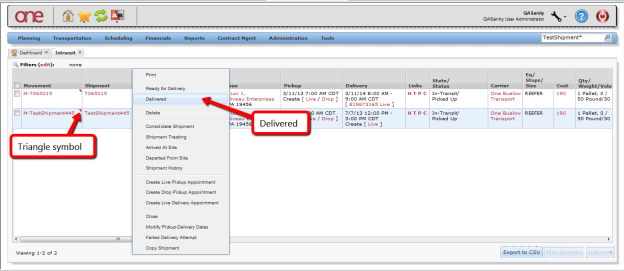
- Once the Movement (and all the Shipments under it) has been physically delivered and the Delivered action applied, the Movement will move to the Delivered state.
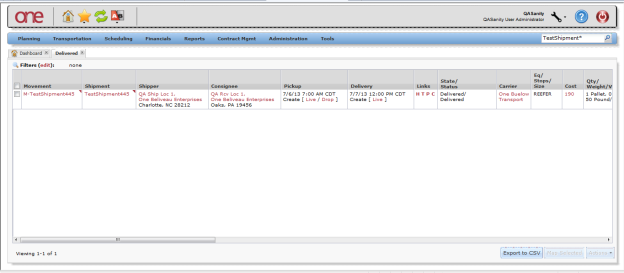
- To view these Movements, Select Transportation -> Delivered.
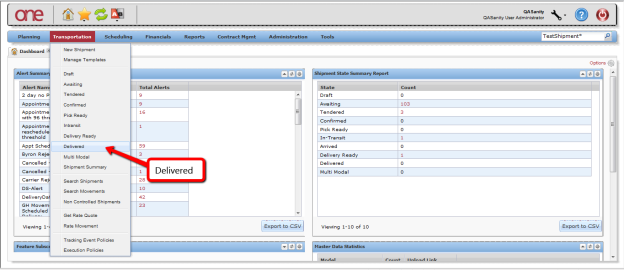
- The Delivered screen is displayed with a summary list of Shipments.
