Introduction
This document provides a quick guide explaining explains how to create a Lane lane in the One Network Systemsystem. A Lane lane defines a Ship From and Ship To location. A Ship From or or Ship To location location can be one of the following: a Countrycountry, a Statestate, a Citycity, or a Postal Code Rangepostal code range. The locations defined on a Lane lane can be as general as you want, such as a Lane lane that goes from the US (i.e U.S. (Country = US) to the US U.S., or it can be more specific, such as a Lane that goes from a Ship From Postal Code postal code to a Ship To Postal Code postal code. Once you create a Lanea lane has been created, you can use this Lane lane in other functions in the system, such as when you create a Route route or a Contract Base Ratecontract base rate.
Creating a Lane
- Login Log on to the One Network Systemsystem.
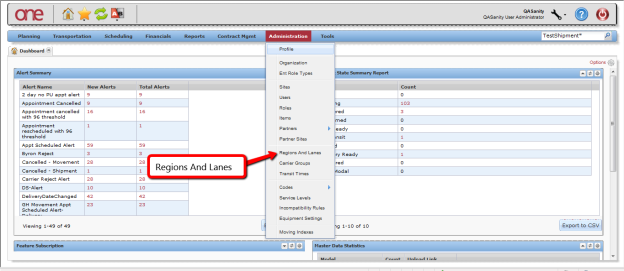
- Select Click Administration - > Regions And Lanes:

The Regions and Lanes screen will be page is displayed, which has a Regions tab, Lanes tab, and a Lanes Zones tab: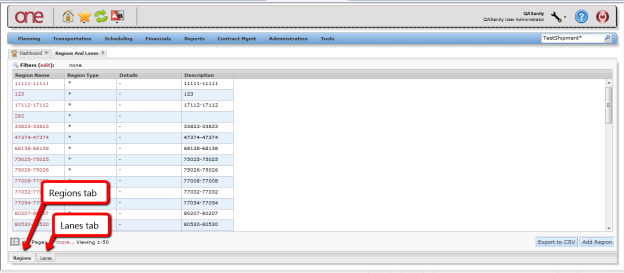

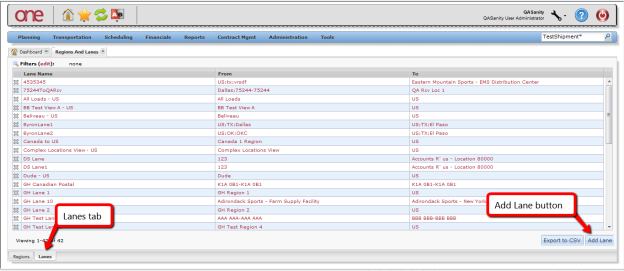
- To add a new lane, select Select the Lanes tab and then press the click Add Lane button:.

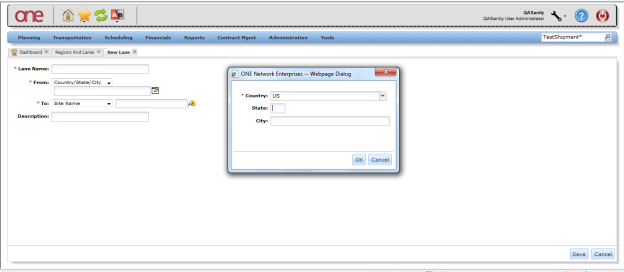
On the New Lane screen page, enter information in the various fields to add the Lanelane.
Note Fields marked with an asterisk symbol symbol (*) are required.
Lane Name field Enter a name for the Lanethe lane. From fieldFirst select the FromType such as From the From drop-down, select an appropriate value. The drop-down consists of various location values such as "Site", "Partner Site", "Country/State/City or ", "Postal Code Range. Using Country/State/City, you can specify just a Country - or a Country and a State - or a Country, State and City. After selecting the Country/State/City Type, choose the icon next to that field and specify the Country/State/City in the popup window and then press the OK button on the popup. When using Postal Code Range, you need to specify a range of postal codes. If you just want to specify one postal code, you would enter something such as "75222 – 75222". To field First select the To Type such as Country/State/City or Postal Code Range and then enter the values similar to what was done on the From field. 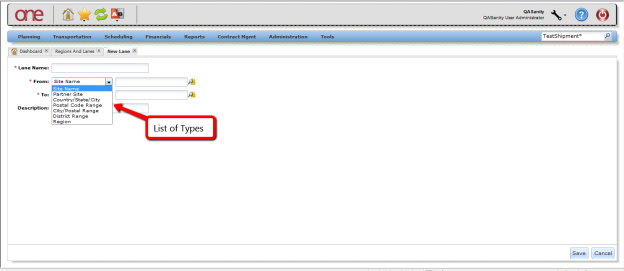
- After entering your information on the New Lane screen, press the Save button at the bottom of the screen.
", "City/Postal Range", "District Range", and "Region". Click on search icon next to the From field to select the address. To field From the To drop-down, select appropriate value. The drop-down consists of various location values such as "Site", "Partner Site", "Country/State/City", "Postal Code Range", "City/Postal Range", "District Range", and "Region". Click on search icon next to the To field to select the address. 
- Click Create to store information about the lane.

You can create multiple lanes. To view lanes, navigate to Administration > Regions and Lanes and select the Lanes tabYou can create multiple Lanes. To view your Lanes, go to Administration -> Regions and Lanes and select the Lanes tab.