Quick Guide to Appointment Rescheduling |
|

Introduction
This document provides a quick guide for
...
carriers and
...
vendors on how to reschedule an appointment using the One Network system.
Appointment Rescheduling
- Login Log on to the One Network system.
- Find your Shipment by first clicking into the Search box (located in the upper right-hand corner of the screen) as shown below:
...
- When you first click into the Search box, you will see a "Search By" field and a "Retrieve For" field.
...
- To find your shipment, click on Search.

- A Search By field and a Retrieve For field appears:
- For the Search By field, make sure that you set "Shipments: by Shipment Number".
- For the
...
- Retrieve For
...
- field, the default choice is "Last 30 Days"
...
- . To look for shipments whose
...
- pickup date is older than 30 days, select one of the other choices from the drop-down list.
- pickup date is older than 30 days, select one of the other choices from the drop-down list.
...
Type
inyour PO number in the Search box.
Warning

...
When entering your PO number in the Search box, you can enter a
...
wildcard (*) symbol, if you do not know or do not want to enter the entire PO number.
...
This can be entered either before or after the PO number.
After entering your PO number,
hit thepress the Enter key
on your keyboard.
- A list of matching PO numbers will be is displayed. Find your the desired PO number which would be that is located under the Shipment column.
- If rescheduling a pickup appointment, click on the Appointment Confirmation Number located under the Pickup column.
- If rescheduling a delivery appointment, click on the Appointment Confirmation Number located under the Delivery column.
...

- An Appointment screen will then be page is displayed with the current scheduled appointment.
- To reschedule this an appointment, click the on Reschedule Appointment button.
...

- A popup window will be pop-up window is displayed in order to specify the reason for rescheduling this appointment.
- Select one of the choices from the drop-down list under the "Reason Code" field and then click the .
- Click on Reschedule Appointment button on the popup window.
...

- A list of available appointment times will be is displayed.
- Select the radio button next to your the desired appointment time and then click the Save button on the bottom right corner of the screen to .
- Click Save to reschedule the appointment.
...

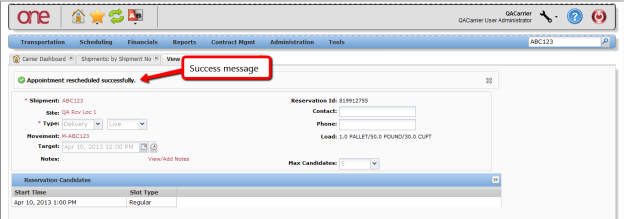
- A After clicking the Save button, you will see a success message appears on the Appointment screen. page along with the Reservation ID (confirmation number).
This confirms
...
- that the appointment has been
...
- scheduled successfully.